 ultimate-guide
Real Estate Drone Photography: Pro Tips for Quality Listings
Table of Contents
- Master Essential Drone Camera Settings for Real Estate
- FAA Part 107 Requirements for Real Estate Drone Operations
- Essential Drone Shots for Property Listings That Sell
- Best Time of Day for Aerial Real Estate Photography
- Composition and Flight Path Planning for Maximum Impact
- Post-Production Workflow: Color Grading and Image Optimization
- Client Communication and Setting Expectations
- Frequently Asked Questions
Last Updated: September 28, 2026
Master Essential Drone Camera Settings for Real Estate
Getting the right camera settings is the difference between a listing that sits and one that sells. Real estate drone photography demands precision across four critical variables: shutter speed, ISO, aperture, and RAW format capture.
For stationary properties, use 1/250th to 1/500th of a second to freeze gimbal movement and maintain sharp detail. If capturing video alongside stills, 1/250th is your sweet spot.
Keep ISO between 100-400 in bright daylight; higher ISO introduces grain that degrades detail. Only exceed 400 during golden hour or overcast conditions.
Most modern drones default to f/2.8, which keeps foreground landscaping and distant sky in sharp focus, critical for showing context.
Capture in RAW format whenever possible. RAW files preserve maximum dynamic range, giving you flexibility during post-production color grading and white balance correction. JPEG compression discards data you can't recover later. In real estate, that extra data translates to richer detail in shadowed areas and better highlight recovery.
FAA Part 107 Requirements for Real Estate Drone Operations
Operating a commercial drone for real estate photography requires FAA Part 107 certification. This isn't optional, it's the legal and insurance foundation for professional work.
You must pass the Remote Pilot in Command (RPIC) knowledge test covering regulations, airspace, weather, and flight safety. Most pilots study 20-30 hours. Certification is valid for two years; the application process takes two to four weeks.
Part 107 requires maintaining visual line of sight, staying below 400 feet altitude, avoiding flight over people or moving vehicles, and restricting operations to daylight. These rules shape flight planning and shot selection but exist for safety.
Insurance and Liability Coverage
Insurance companies require Part 107 credentials before issuing commercial drone policies. Standard coverage includes general liability (property damage or bodily injury claims) and hull coverage (equipment protection).
General liability is essential; it covers legal defense and damages (typically $1 million) if your drone strikes property or people. Hull coverage protects equipment investment ($2,000-$5,000 for mid-range drones).
Many insurance carriers also offer errors and omissions (E&O) coverage, which protects against claims that your photography services caused financial loss to a client, for example, if your imagery misrepresented a property's condition or features. This is less common in real estate drone work than in other aerial services, but it's worth discussing with your broker.
Carriers require Part 107 certification and clean flight records. Some offer discounts for advanced safety courses or documented flight logs.
Waivers and Special Authorizations
Part 107 restrictions can be waived for flying over people, night operations, or exceeding 400 feet. Waiver requests require detailed flight plans and risk assessments; processing takes 90+ days. For most real estate shoots, standard rules suffice.
Essential Drone Shots for Property Listings That Sell
The most effective property listings combine multiple angles that tell a complete story about the home's location, features, and appeal.
Nadir and Oblique Angles
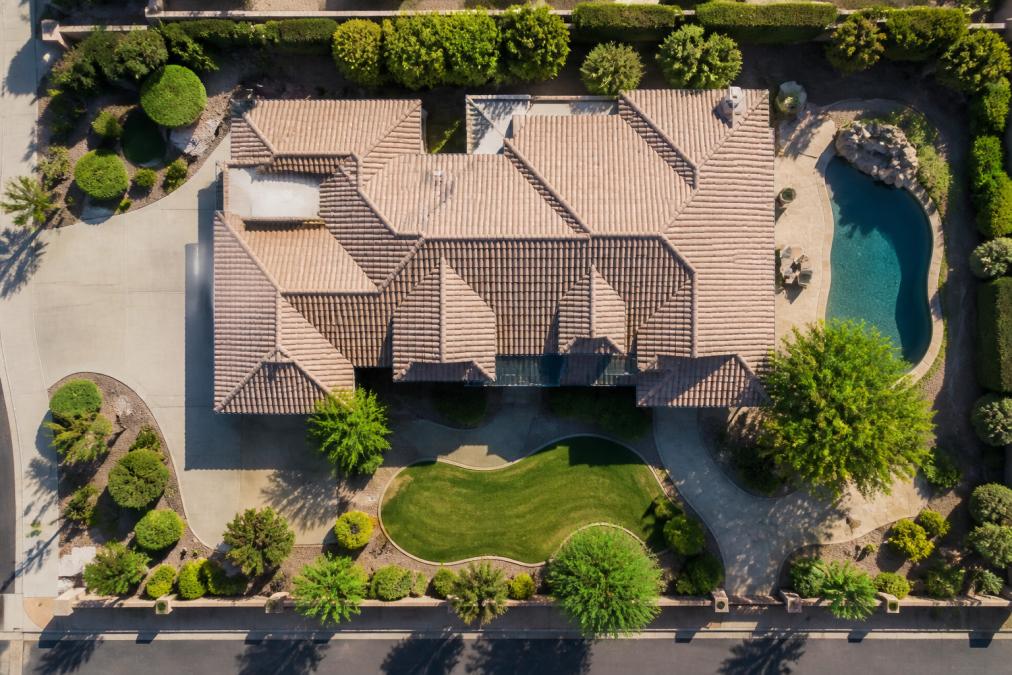
Nadir shots capture the property from directly overhead, showing roof, pool, and lot size. Oblique angles (45-degree) show how the home sits within its neighborhood, revealing proximity to trees and street access. Combine both: start with nadir shots for clarity, then capture oblique angles from multiple directions.
Property Exterior and Surrounding Context
Capture the home's front elevation at eye level to show entry, landscaping, and architectural details. Include establishing shots showing the property within neighborhood context, amenities, parks, schools. Add close-up detail shots of unique features to highlight what makes the property distinctive.
Best Time of Day for Aerial Real Estate Photography
Avoid midday sun, which creates harsh shadows and washes out colors. Golden hour (first two hours after sunrise, final two hours before sunset) delivers warm, directional light that adds dimension. Overcast days work well as natural diffusers. Position yourself so sunlight illuminates the home's front-facing surfaces while keeping the sky properly exposed.
Composition and Flight Path Planning for Maximum Impact
Strong composition separates professional listings from amateur attempts. Apply the rule of thirds, position the home's most compelling features along the lines that divide your frame into thirds rather than centering everything. This creates visual tension and engagement.
Plan your flight path before takeoff. Map out the angles that showcase the property's best features, the surrounding landscape, and the neighborhood context. Know where you'll position the sun relative to the home at each shot. Anticipate wind conditions and gimbal movement.
Establish shot sequences that tell a narrative. Begin with wide establishing shots that show the property's location and scale. Progress to medium shots revealing architectural details and outdoor living spaces. Conclude with detail shots of unique features. This narrative structure keeps viewers engaged through the entire sequence.
Use GPS positioning to lock your drone's position during key shots, ensuring consistent framing and smooth transitions between angles. Modern drones offer waypoint planning tools that automate complex flight paths, reducing pilot workload and improving consistency.
Post-Production Workflow: Color Grading and Image Optimization
Raw files require post-processing to reach their full potential. A professional workflow balances quality with efficiency, especially when handling multiple properties per month.
Color Correction and Grading Foundation
Begin with white balance correction. Arizona's intense sunlight can create color casts, warm tones from afternoon heat shimmer, cool tones from morning haze. Correcting this in post-production ensures colors appear natural and inviting. Use your drone's RAW metadata (which records color temperature at capture) as a starting point, then refine based on the property's actual appearance.
Apply selective color grading to enhance the property's appeal. Boost greens in landscaping to emphasize outdoor features, this is especially effective for properties with mature trees or manicured gardens. Enhance sky saturation to create visual drama without appearing artificial; a deep blue sky photographs better than a washed-out pale one, but oversaturation looks unnatural. Adjust skin tones if human subjects appear in your footage; people should look healthy, not orange or sickly.
Dynamic range recovery is critical in desert environments where bright skies and shadowed structures create exposure challenges. RAW format preserves highlight and shadow detail that JPEG compression destroys. Use tone mapping and selective exposure adjustments to recover detail in both areas, creating balanced, visually compelling imagery.
Batch Processing and Workflow Automation
Processing images manually is inefficient. Professional workflows use batch processing to apply consistent adjustments across all images from a single shoot. Most editing software supports creating and applying presets, saved adjustment profiles that standardize color, contrast, and tone across your entire library.
Develop a house preset for each property type or lighting condition. Create one preset for golden hour shoots, another for overcast conditions, and a third for midday work. Apply the preset to all images from that shoot, then make minor individual adjustments only where needed.
Automation extends beyond color grading.
Integration with Virtual Tours and Listing Assets
Drone photography rarely stands alone. Most luxury listings now include 3D virtual tours, floor plans, and property walkthroughs. Your drone imagery should integrate seamlessly with these assets.
File Organization and Delivery Standards
Consistency in file naming and delivery prevents confusion and speeds up client workflows. Use a naming convention like [PropertyAddress]_[ShotType]_[Number].jpg, for example, 123MainSt_Nadir_001.jpg, 123MainSt_Oblique_NE_002.jpg. This makes files easy to sort and identify in bulk.
Client Communication and Setting Expectations
Clear communication prevents disappointment and builds long-term client relationships. Before the shoot, discuss what the client envisions. Do they want dramatic golden hour imagery, or do they prefer the clarity of overcast conditions? Are there specific features they want emphasized? Understanding their priorities shapes your shot list.
Frequently Asked Questions
What camera settings should I use for real estate drone photography?
Start with ISO 100-400 depending on light conditions, shutter speed 1/100 to 1/250 second, and aperture f/2.8-f/5.6 to maintain depth of field. Shoot in RAW format to preserve dynamic range and allow flexibility in post-processing. Use 4K video resolution at 24fps for smooth footage, and lock your white balance to avoid color shifts between shots. Gimbal stabilization handles movement, so focus on consistent exposure settings across your flight.
Do I need FAA Part 107 certification to photograph real estate properties with a drone?
Yes. Any commercial drone operation, including real estate photography, requires FAA Part 107 certification from the pilot. This means passing the Remote Pilot Knowledge Test and maintaining current credentials. If you're hiring a drone operator, verify their FAA certification and ask about their drone insurance coverage to protect yourself from liability. Operating without certification exposes you to federal penalties and legal risk.
What's the best time of day to shoot aerial real estate photography?
Golden hour, the first hour after sunrise or the last hour before sunset, provides warm, directional light that flatters property exteriors and creates visual depth. Avoid harsh midday sun (10 AM to 3 PM), which creates blown highlights and dark shadows. Overcast days work well for consistent, even lighting without contrast issues. Plan your shoot schedule around seasonal changes; winter sunsets occur earlier, affecting your available window. Always check weather and plan flight paths before arrival.
How long does the entire drone photography process take from shoot to delivery?
A typical shoot takes time depending on property size and shot complexity. Post-production, color grading, white balance correction, RAW conversion, and file optimization, adds additional time per session. Full delivery including virtual tour integration or 3D tour preparation can take time. Communicate your deadline upfront; rush delivery may affect turnaround. Professional workflows use batch processing to handle multiple properties efficiently without sacrificing quality.