 blog
blog
Best Software for Real Estate Photo Post-Processing
Table of Contents
- Why Real Estate Photo Post-Processing Matters
- Real Estate Photo Editing Software: Core Features to Evaluate
- HDR Real Estate Photo Editing Software and Exposure Blending
- AI Real Estate Photo Editing: Automation and Speed
- Real Estate Photo Editing Workflow: Desktop vs. Cloud Processing
- Pricing and Total Cost of Ownership
- Common Editing Mistakes That Hurt Listing Appeal
- Frequently Asked Questions
Last Updated: October 17, 2026
Why Real Estate Photo Post-Processing Matters
The difference between a listing that sits for months and one that sells in weeks often comes down to image quality.
Professional post-processing handles what cameras can't: uneven interior lighting, harsh exterior shadows, blown-out skies, and wide-angle distortion. Done well, it makes rooms feel larger, brighter, and more inviting. Done poorly, it looks artificial and repels buyers.
At Desert Home Photography, hand-blended editing techniques elevate listings dramatically.
Real Estate Photo Editing Software: Core Features to Evaluate
Choosing the right software depends on your workflow volume, technical skill, and budget. A solo agent with five listings monthly has different needs than a team processing fifty properties weekly.
Batch Processing and Workflow Speed
Batch processing applies consistent edits to dozens of images at once, saving hours of manual work, essential for high volume. Many photographers apply presets to entire folders from the same shoot, since consistent lighting means consistent editing needs. Look for software that saves and reuses editing profiles, and lets you adjust batch settings before applying them to prevent costly rework.
RAW File Support and Color Accuracy
RAW files contain far more color and tonal information than JPEGs, letting you recover blown highlights, lift shadows, and adjust white balance without degrading quality (What are the differences between JPEG and RAW?).
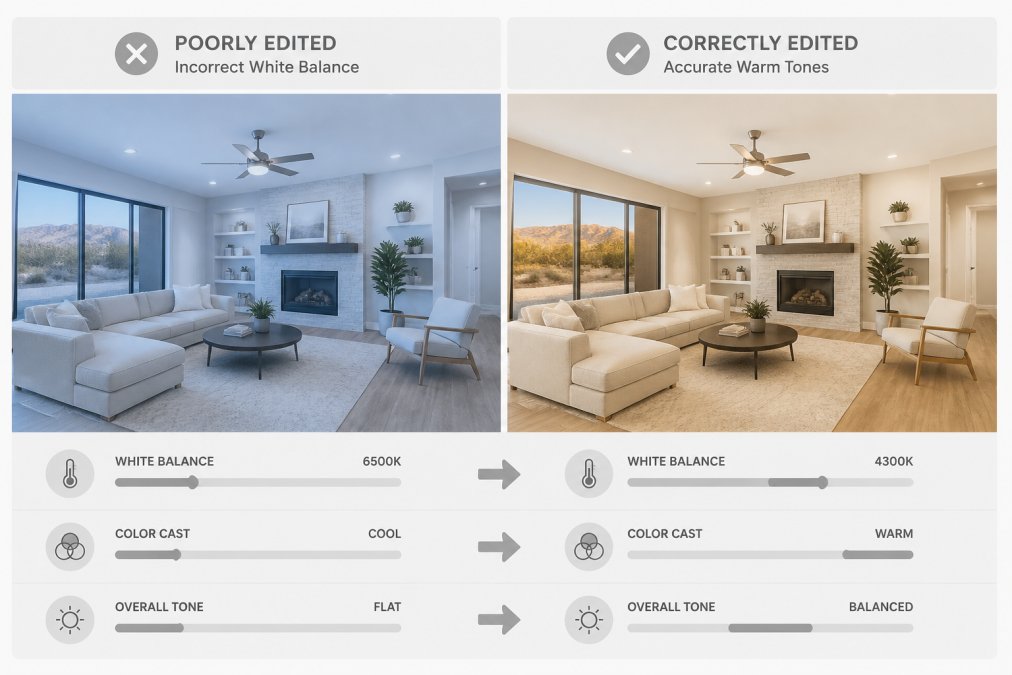
Color accuracy matters because listing photos must represent properties honestly. Oversaturated blues make skies look unnatural, and warm casts make interiors look dingy.
Desktop software typically offers superior RAW processing and color management than cloud alternatives, important if color accuracy is your priority.
Perspective Correction and Lens Distortion
Wide-angle lenses are standard in real estate photography because they make rooms appear larger.
Professional software includes lens correction profiles for common cameras and lenses that automatically fix known distortion patterns, plus manual tools to fine-tune vertical and horizontal lines.
Perspective correction is where amateur editing often falls short: overcorrected images look warped and undercorrected ones still feel off.
HDR Real Estate Photo Editing Software and Exposure Blending
HDR (High Dynamic Range) photography captures multiple exposures of the same scene, then blends them to recover detail in both highlights and shadows, solving one of real estate photography's biggest challenges: interior rooms with bright windows.
Tone Mapping and Dynamic Range Recovery
Tone mapping compresses the extended dynamic range from multiple exposures into a single image that displays correctly on screens (Fast Single-Image HDR Tone-Mapping by Avoiding Base Layer Extraction).
Tone mapping software should include sliders controlling how aggressively tones are compressed.
The best HDR tools let you blend exposures manually rather than relying entirely on automatic algorithms, ensuring the final image matches your creative intent and represents the property accurately.
Interior and Architectural Photography Use Cases
Interior photography demands precise white balance and shadow recovery.
Exterior shots often need sky replacement or enhancement because the sky blows out or the ground underexposes. Efficient sky replacement software saves significant time on high-volume shoots.
Properties with dramatic features like vaulted ceilings, large windows, or stonework require editing that preserves detail without looking overdone.
AI Real Estate Photo Editing: Automation and Speed
AI is reshaping real estate photo editing by automating repetitive tasks. AI-powered tools now handle sky replacement, object removal, and exposure correction with minimal input, dramatically reducing editing time for high-volume teams.
Automated Sky Replacement and Object Removal
Modern AI tools recognize skies, cars, utility lines, and other distractions, then replace or remove them intelligently. Results are often acceptable for listing photos without manual refinement, eliminating hours of masking work.
AI replacement isn't perfect: edges sometimes show artifacts and colors occasionally don't match. Choose software that lets you review and refine AI results rather than applying them blindly.
When to Use AI Tools vs. Manual Editing
AI tools excel at high-volume, straightforward edits like batch sky replacement, basic object removal, and exposure correction across dozens of images.
Manual editing gives complete control: fine-tuning colors, selectively recovering shadow detail, and making artistic decisions that preserve the property's character. It takes longer but produces more consistent, intentional results.
The best workflow combines both: use AI for initial batch processing and obvious corrections, then refine manually where quality matters most, such as hero shots, detail images, and challenging lighting.
Real Estate Photo Editing Workflow: Desktop vs. Cloud Processing
Your editing environment affects both quality and efficiency, but the more useful question is how it fits into an end-to-end workflow. Desktop software offers maximum control and speed; cloud processing provides flexibility and scalability. The right choice depends on your volume, team size, and where each step of the process happens.
A Practical End-to-End Workflow
Regardless of platform, a reliable real estate post-processing workflow follows the same sequence. Map your tools to each step before comparing products.
- Import and cull. Bring RAW files in, apply lens profiles, and cull duplicates and misfires. A fast culling step saves editing time later.
- Merge brackets. Combine exposure brackets for interiors with bright windows. Review the merged result for halos and color shifts before moving on.
- Correct perspective and lens distortion. Apply automated profiles first, then fine-tune vertical and horizontal lines manually. Restraint matters more than perfection here.
- Balance color and white balance. Neutralize casts, then make subtle adjustments that preserve the room's true character.
- Recover highlights and shadows. Pull window detail back into view and lift dark interiors without flattening contrast.
- Retouch distractions. Remove cars, utility lines, and clutter, using AI where it is reliable and manual masking where edges matter.
- Export to listing specifications. Match dimensions, file format, and compression to the requirements of the listing platform you deliver to.
- Deliver and archive. Send final files with a clear naming convention and archive the RAW originals and edit settings for future reference or re-edits.
Desktop Software for Full Control
Desktop applications give you complete control over every editing parameter. You work with RAW files locally, see results in real time, and have access to advanced tools for perspective correction, color grading, and selective adjustments.
Performance matters. Processing large RAW files and applying complex adjustments demands adequate RAM and processor speed. Investing in proper hardware pays dividends through faster workflow and fewer crashes.
Cloud-Based Solutions for Scalability
Cloud platforms let multiple team members access and edit images simultaneously. Changes sync across devices, so you can start editing on a desktop, continue on a tablet, and review on a phone, flexibility that suits distributed teams and remote workflows. Cloud processing handles heavy lifting on remote servers rather than your local machine, which reduces hardware requirements and lets you absorb volume spikes without infrastructure investment.
Choosing by Workflow Stage
A useful pattern is to split the workflow by stage rather than choosing one environment for everything. Many practitioners do initial culling and batch corrections in the cloud for accessibility, then move hero images to desktop for precise perspective and color work. Others keep everything on desktop and use the cloud only for delivery and client review.
Whichever environment you choose, document your workflow so every team member applies the same sequence and settings. Consistency across a listing's image set is what separates professional results from a folder of individually edited photos.
Pricing and Total Cost of Ownership
Software costs extend beyond subscription fees. Storage, hardware requirements, learning time, support, and rework all factor into what a tool actually costs your business. A cheap tool that demands expensive hardware or produces results requiring rework often costs more than a premium option with an efficient workflow. The most useful way to compare options is to model total cost of ownership at your actual monthly photo volume.
The Four Cost Models You Will Encounter
Real estate post-processing tools generally fall into four pricing structures, and each behaves very differently as volume scales.
Subscription software. Monthly or annual plans that bundle RAW processing, batch editing, and cloud sync.
One-time licenses. Perpetual licenses with optional paid upgrades. The upfront cost is higher, but there is no recurring fee.
Per-image editing services. Outsourced editing priced per photo or per property.
Modeling Cost at Three Volume Tiers
Rather than quoting a single price, build a simple monthly model. Exact figures depend on the plans and services you choose, so treat the structure below as a template and plug in current quotes.
- Low volume (about 1-5 properties per month). A subscription or a modest per-image service usually wins. Fixed software cost is small relative to the value of each listing, and the learning curve is the bigger expense. Free trials are worth using here to test RAW handling and batch behavior before committing.
- Mid volume (about 6-20 properties per month). This is where the subscription-versus-license decision matters most. Compare the annual subscription cost against a one-time license plus occasional upgrades, and factor in the hours saved by batch presets and AI-assisted corrections. At this tier, editing time is often the largest hidden cost.
- High volume (20+ properties per month, or teams). Per-seat subscription costs and storage overages add up quickly. Many teams blend approaches: in-house software for routine batches and outsourced editing for overflow or hero images. Model the blended cost rather than choosing one model exclusively.
The Hidden Costs Competitors Skip
Three costs rarely appear in software comparisons but dominate real budgets.
Editing time. Multiply the hours you spend per property by your effective hourly rate.
Hardware and storage. Desktop RAW processing rewards adequate RAM, fast storage, and a color-accurate display. Cloud tools shift compute to remote servers but still require reliable bandwidth and paid storage tiers.
Rework and consistency. Inconsistent edits across a listing force rework.
When you evaluate quotes from editing services, ask for the per-image rate, revision policy, turnaround time, and file-delivery format. Those four terms determine whether an apparently cheap rate is actually cheap at your volume.
Common Editing Mistakes That Hurt Listing Appeal
Poor editing destroys the impact of quality photography.
Overcorrecting perspective is the most obvious error.
Inaccurate white balance makes interiors look dingy or cold.
Blown-out windows are another common failure.
Over-saturation makes colors look artificial and untrustworthy. Buyers notice when colors don't match reality.
Inconsistent editing across a listing's image set confuses viewers.
The real estate market rewards listings that look their best.
Frequently Asked Questions
What software do real estate photographers use for post-processing?
Real estate photographers typically use desktop software like Lightroom, Capture One, or specialized HDR tools for exposure blending and tone mapping. Many also integrate AI-assisted editing platforms for batch processing and automated sky replacement. The choice depends on workflow volume, RAW file handling needs, and whether you're managing bracketed exposures for HDR merging. Desktop solutions offer more control over color accuracy and perspective correction, while cloud platforms scale better for high-volume listing production.
How does HDR real estate photo editing software improve interior photography?
HDR editing software merges multiple bracketed exposures to recover detail in both highlights and shadows, which is essential for interior photography where windows blow out and interior walls fall into darkness. Tone mapping algorithms balance these extremes without creating unnatural-looking images. This technique is particularly valuable in bright Valley properties where natural light creates extreme contrast between indoor and outdoor spaces. The result is a balanced, listing-ready image that shows room dimensions and features accurately.
Can AI real estate photo editing replace manual editing entirely?
AI tools excel at repetitive tasks like sky replacement, object removal, and basic exposure adjustment, making them valuable for batch processing large volumes of images. However, they cannot match manual editing for nuanced white balance correction, selective highlight recovery, or architectural perspective straightening that requires judgment. Most professional workflows combine AI automation for initial passes with manual refinement for critical details. This hybrid approach balances speed with the quality control needed for competitive listings.
What's the typical turnaround time for real estate photo editing at scale?
Desktop software editing typically takes 5-15 minutes per image with manual control, while batch processing through cloud platforms can handle 50-100 images per hour with AI assistance. Turnaround depends on volume, complexity, and whether you're doing HDR merging or single-image editing.